Part 2 of my infinity-part series on all the layers I need to make to wear one Victorian outfit.
Now that I have finished my lobster tail bustle, I need some outerwear to go with it. This particular bustle is not equipped with ruffles or any other fabric that might help hide the boning, so it will require a petticoat to wear over it. I have ordered the petticoat pattern and am waiting for it (oh wait, it arrived just now today! yay!). Over the ruffly petticoat to hide the boning, is the skirt. This can be as plain or ornate as desired. I have ordered a lot of yards of blue taffeta to make the skirt, waited 3-5 days for the item to ship, and then just today got word that they only have 5 fewer yards than I need. So I ordered some different blue skirt fabric today, but I’m still waiting for that. I do have the pattern already, though. Over the skirt goes the aptly named overskirt. And that, that is the thing I have made this week because I have both the pattern and the fabric together at the same time in the same place. So far I have made a skirt sandwich, but only the bread. No filling….
Construction time
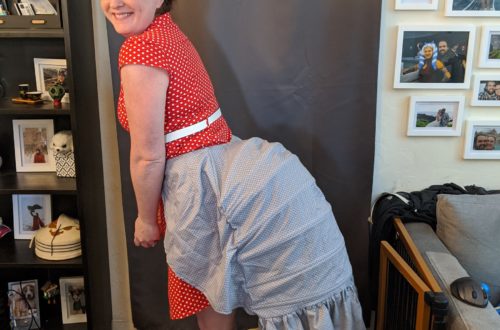
I began this project when I found a really interesting silk sari on etsy. This is a good, inexpensive way to find fabric for projects when you are still learning historical sewing techniques. The sari has a blue background with flower bunches on the pallu, and the rest of the fabric is blue/dark blue/white stripes with blue flowers dispersed throughout. It’s an interesting mix of stripes and florals, and I really like the pattern. I selected the Truly Victorian Cascade Overskirt for the pattern. I really like the big, fluffy look in the back.
The pattern was very easy to cut out, as there are essentially 4 pieces: The 2 mirror image back pieces that form the ‘floof’, the front apron piece, and a waistband. How hard could it be? I cut out the pieces, and followed the instructions for making the V-shaped split in the front apron part of the skirt. Great, no problems. I then followed the instructions for stitching darts around the waistline and pleating the 2 sides of the apron piece. There are symmetrical wide pleats on either side of the apron, and then some even wider pleats.
This pattern went from ‘how hard could it be?’ to “WTF is a burnous pleat?” in about 5 minutes. As I moved from the completed apron piece to begin working on the back pieces, there is a large portion of the pattern piece marked “burnous pleat”. I started by searching for a how-to youtube video, with no luck. Just normal pleats, knife pleats, box pleats, etc. I tried just generally googling it and arrived at no particular answer that would explain how exactly to make one. However, I pressed on and continued following the pattern instructions, dreading the moment that I would come to the instruction “make a burnout pleat” and then I’d have to just burn the whole project because I have no idea what I’m doing.
Fortunately, that never happened. The instructions in the pattern don’t actually call what you are making a ‘burnous’ pleat, but it does give step-by-step instructions for whatever pleating arrangement is required in the pattern. No need to panic. The back pieces are just 2 large rectangles. I took each one and, following the pattern, added pleats to one half of one of the 4 sides. I followed that by gathering as tightly as possible a portion of one of the other sides. Then, on a third side, I stitched in another set of pleats along the whole side. Because my fabric is single-sided, I had to pick these out and do them again to get the right side of the fabric to always be on top. This was my mistake, not the pattern.
Then, just blindly following instructions because I have no idea what is going on here, I positioned the gathers over the first set of pleats and stitched them down. Then I positioned the second set of pleats under and behind the gathers and stitched them down. Now I have a very strange kind of knot of fabric that is, indeed, quite floofy. Actually, I have 2 of them.
Continuing on, I pressed the waistband in half and pinned and stitched the apron to the center of the waistband and the back pieces overlapping the apron slightly. Then I flipped it over and hand-stitched the waistband into place on the inside.
Because the fabric I had selected was so thin, it didn’t want to sit in its proper place, so I added the ‘optional stitching’ from the pattern instructions to stitch the pattern pieces together in the center back and where the apron meets the side/back. The final addition was a single hook and bar closure in the center back of the waistband, and this quick one-day project was complete.
Final Results
I like the fabric color, but seeing how it lays, I wouldn’t pick something this light and airy for this particular pattern. It definitely needs a bit more rigidity. And because I am short, I think the front/apron of the skirt being so long isn’t super flattering, so I think I’m going to take out those pleats and make them much tighter/smaller to lift the skirt front a bit. The instructions also suggested using a very generous amount of trim: ruffles, lace, edging of all sorts. It even includes the best instruction ever: be sure to trim the trim. But, since I don’t yet have the underskirt fabric, and I’m not sure how the colors will look together and how the trim will look, I will wait and add some after I finish the skirt. This is by far a more challenging approach, as it would be much simpler to add edging to 4 sides of a rectangle and then pleat it into a **burnous** pleat. But it will be much more effort to get the trim over and around the pleats and gathers and get it to look right.