It is 2020 and we are still under shelter-in-place orders, so for my birthday, I celebrated #atHomeTogether. I wanted to plan a relaxing, luxurious day for myself, but also have some fun and not be bored. This resulted in what I called my “Birthday Obstacle Course”. I sectioned my back yard into activity stations, with a lounging area to play Animal Crossing, a refreshment area stocked with an array of charcuterie and accoutrements, a table with a hand-sewing project to work on, and through it all, I kept open a Zoom chat wherein pretty much anyone I know could drop in at any time and have a chat.
It was truly amazing. I talked to some people I haven’t seen in years. I relaxed. I sewed. I ate. Oh yes, the best part of any party is the food. And this one was no exception. But this party ran all day, so I needed food fit for a party allllll day. I began the day with my attempted recreation of one of my favorite breakfasts ever: the Mediterranean breakfast buffet at the Hotel El Minzah in Morocco. We were there 6 years ago on my birthday. Their spread of dried fruit and nuts and yogurt and cheese and honey was amazing. This truly is the land of milk and honey. So I found myself some European style yogurt (from the Strauss family creamery, of course), and dried papaya and apricots, and a block of honeycomb, and a grapefruit, and enjoyed it with a sparkling moscato (a delicious alternative to a mimosa). A simple breakfast, but delicious.
To meet my fanciness quota without exhausting myself with cooking (and dishwashing) duties, I opted for a charcuterie spread for lunch. Prosciutto, speck, 5 kinds of cheese, dried fruits, nuts, honeycomb, olives, and my homemade focaccia and some sea-salt crackers. Tiny amounts of each of those things created endless combinations of flavors. It was indulgent and delicious. This was a great way to enjoy something luxurious without being too heavy, since we still have to plan dinner!
That evening, we enjoyed some sous vide steaks, with brussel sprouts, baked potatoes, and roasted bone marrow on brioche. This was a heavy, indulgent meal, and it felt very celebratory. But that’s not what we’re here to talk about. We’re here for the dessert.
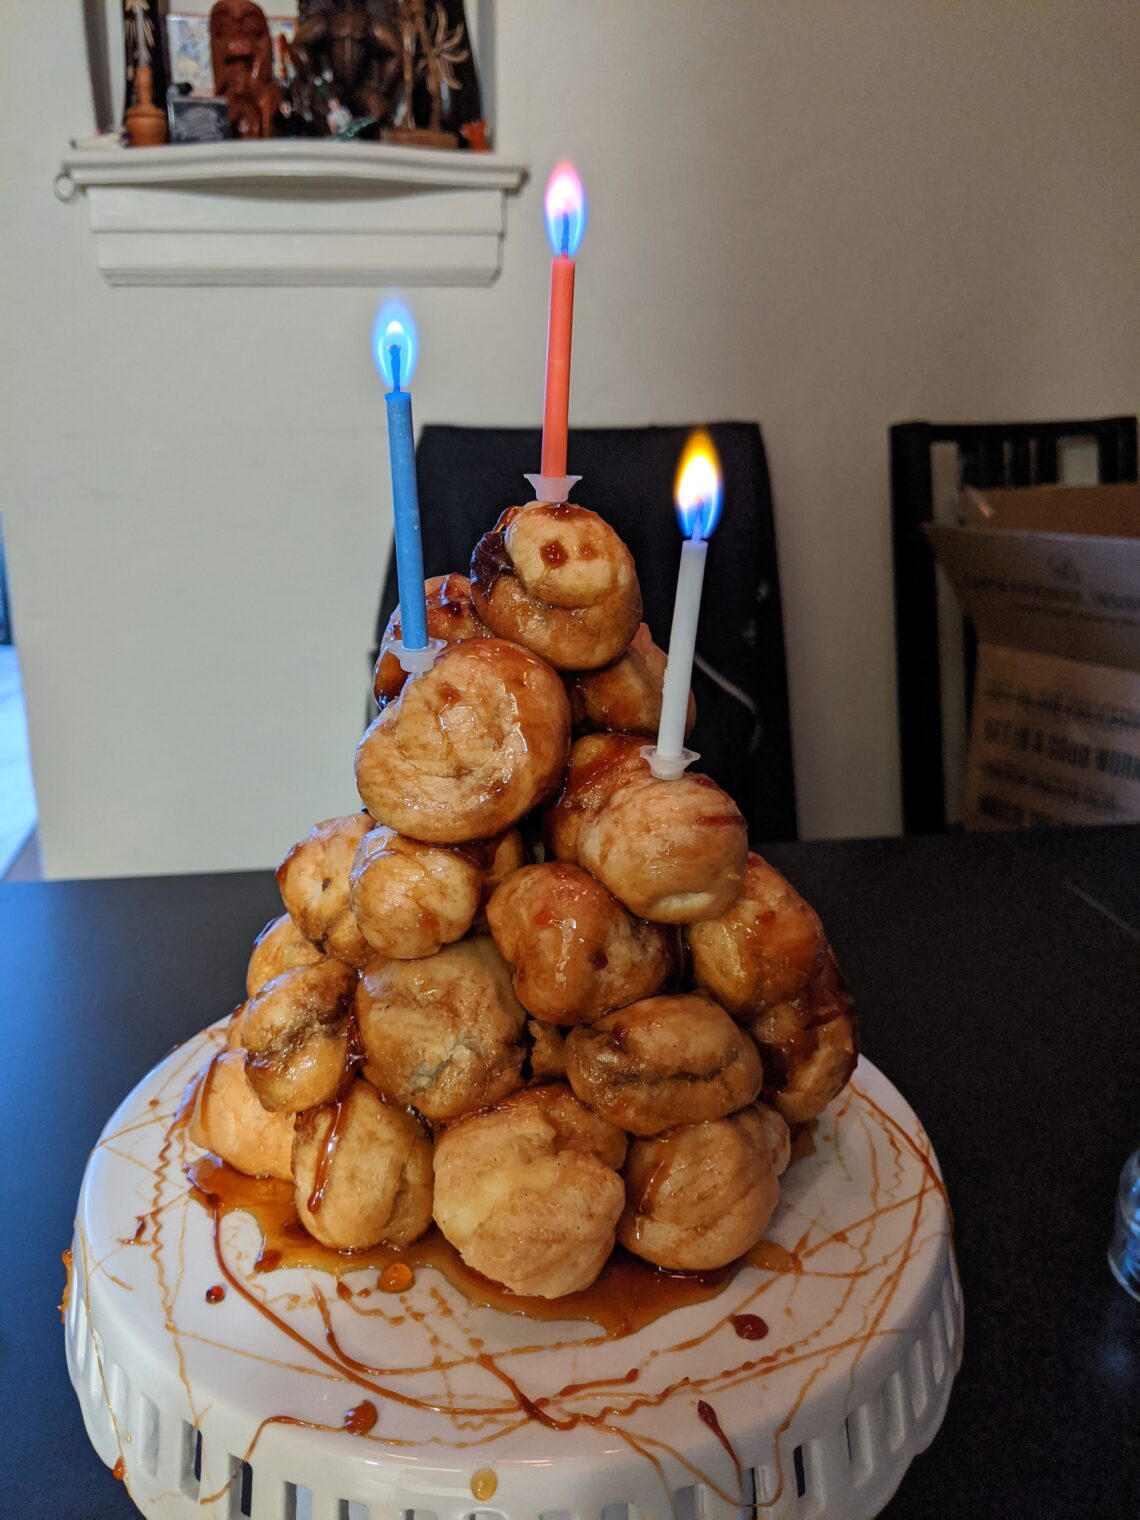
For dessert/my birthday cake, I decided to finally dive in and make a Croquembouche. I’ve been eying this delicacy for literally years, but never had an occasion to make one. Well, my friends, today is the day. A croquembouche is a tower of cream puffs, glued together with caramelized sugar, and is traditionally served at French weddings.
Making the shells
I started the day before my birthday and made the pastries. The shells of cream puffs are made of pâte à choux, an egg-based pastry dough that puffs up into a hollow shell when baked. The same dough is used for eclairs, cream puffs, lots of custard-filled French pastries.
For the recipe, I used Alton Brown’s version. I did not change anything in the recipe, so I’ll just link it here. The process was actually pretty straightforward. Water, butter, salt are mixed together and brought up to boiling in a pot. Once boiling, the flour is added all at once and has to be stirred until a ball of dough forms. Then the dough is cooked for a few more minutes until a film starts forming on the bottom of the pan. This film is apparently important, letting you know when enough water has been released from the dough.
From there, the dough ball is plopped into a stand mixer and allowed to cool for 5 minutes. Then, eggs are added 1 at a time, while mixing. Each egg is fully incorporated into the dough before the next one is added. This all worked very smoothly! I was surprised at how easily it came together. Once all of the eggs are added, the next thing to check is that the paddle from the mixer, when extracted from the dough, has a triangular bit of dough hanging from the bottom. If it’s too long and narrow, the dough has too much liquid. If the dough doesn’t form a triangle or doesn’t stick to the paddle, it’s too dry. I’m sure no one is surprised that mine turned out juuuust right.
This warm, loose dough is then added to a piping bag and little circles are piped onto a baking sheet. I watched several videos showing the proper technique for piping out the dough without having a little peak sticking up at the end, but I was only about 30% successful at getting a nice, flat circle. After piping them onto the pan, I dipped my finger in some water and poked down the little peaks, to keep them from burning. Here is one of the videos I watched, wherein an adorable Irish lady says “boop” every time she pokes the little peaks back down. You’re welcome.
The final step is to bake them, and don’t peak! The shells need to be baked at a high temperature for 25 minutes, and if you open the oven door, they might not make enough steam to puff up and make the empty shell. However, with my very janky oven, this was a torturous 25 minutes, as I could smell them baking and I wasn’t entirely sure they weren’t burning to a crisp in there. Fortunately, I trusted my nose and peaked in at about 22 minutes and all was well. After pulling them from the oven, I poked a hole in the bottom of each one, to let steam escape. This keeps them from getting soggy or collapsing while cooling.
The filling
For the filling, I went with traditional ‘pastry cream’, which is a form of custard that is commonly used in pastries (like eclairs and cream puffs). I’ve never made this before, so I consulted my resources and decided to go with Chef John’s recipe from Food Wishes. I really loved how this turned out and would definitely recommend this recipe. I am usually not at all a fan of custard filled doughnuts and such, so I know that bad pastry cream can ruin a whole recipe. This one was really amazing, super light and fluffy and extremely vanilla. It tastes like you took a creme brulee and whipped it into a whipped cream. It is somehow that indulgent and heavy and also that light and fluffy. Mmmm.
The recipe here uses pretty standard techniques. Cream the eggs and sugar together with some corn starch. Bring some milk to almost boiling, with a whole scraped vanilla bean. Temper the eggs with the hot milk, then add the egg mixture to the rest of the milk and cook over med-low heat until a thick, creamy custard forms. And that was it. I actually did this part on my birthday in the morning.
I decided that I wanted 2 flavors of filling, so I took a little bowl and microwaved some vahlrona dark chocolate. I added half of the vanilla custard cream to the chocolate and mixed well. Then I put both the vanilla and chocolate creams in the fridge, wrapped in cling film.
Assembly
I took each of the shells, and, using a piping bag, filled them with custard, half chocolate and half vanilla. 1 recipe of custard filled about 2/3 of the shells. The rest I left empty, to enjoy later. We now have a pile of cream puffs. The final step was assembling the tower. This involves taking some sugar, corn syrup, and water, and heating up to the caramel stage, around 320F. Then, while the sugar is still hot and liquid, each cream puff is dipped in and added to the tower. The sugar cools and glues the cream puff into place. This bit took some trial and error, as I watched several approaches to stacking the tower. Some people used a pyramid-shaped mold and stacked the cream puffs around the outside of it. Some stacked the cream puffs inside a cone shaped mold. And some just assembled by hand without a mold. I tried using a mold first, but I could tell that, even covered in parchment paper, the sugar was not going to let go of the mold. So I scrapped that in favor of just building it by hand. Well…. building it by chopstick. I did not want to lose any fingerprints that day, so I used Duff Goldman’s recommended technique of using chopsticks. In the other hand, I used a piece of crumpled up parchment paper to support the back side of each piece until it was locked in place.
The final-final step was to add spun sugar. For this, I took a spoon and my croquembouche and my boiling hot sugar and I went outside. No way did I want all that sugar drizzling all over my kitchen floor. I put the croquembouche (on the cake plate) on the ground, and I drizzled molten sugar from 4-5 feet above it. The sugar cools on its way down, making very fine threads. Once this was complete, it was ready to photograph! I mean eat!! Joe actually did the most-final step, which was to add some lovely birthday candles to the cake, and pour me a big glass of milk to wash down all that sugar.